
Creating Invoices
- Creating Draft Invoices
- Creating Fixed Fee Invoices
- Creating Split Billing Invoices
- Creating Retainer Invoices
- Consolidate Multiple Matters for Invoicing
- Creating an Invoice Without dates
- Translate an Invoice
- Hold Billing Until Next Invoice or Permanently
- Send an Invoice
Creating Draft Invoices
This article will walk you through how to create, view, download, and send out draft invoices.
Create
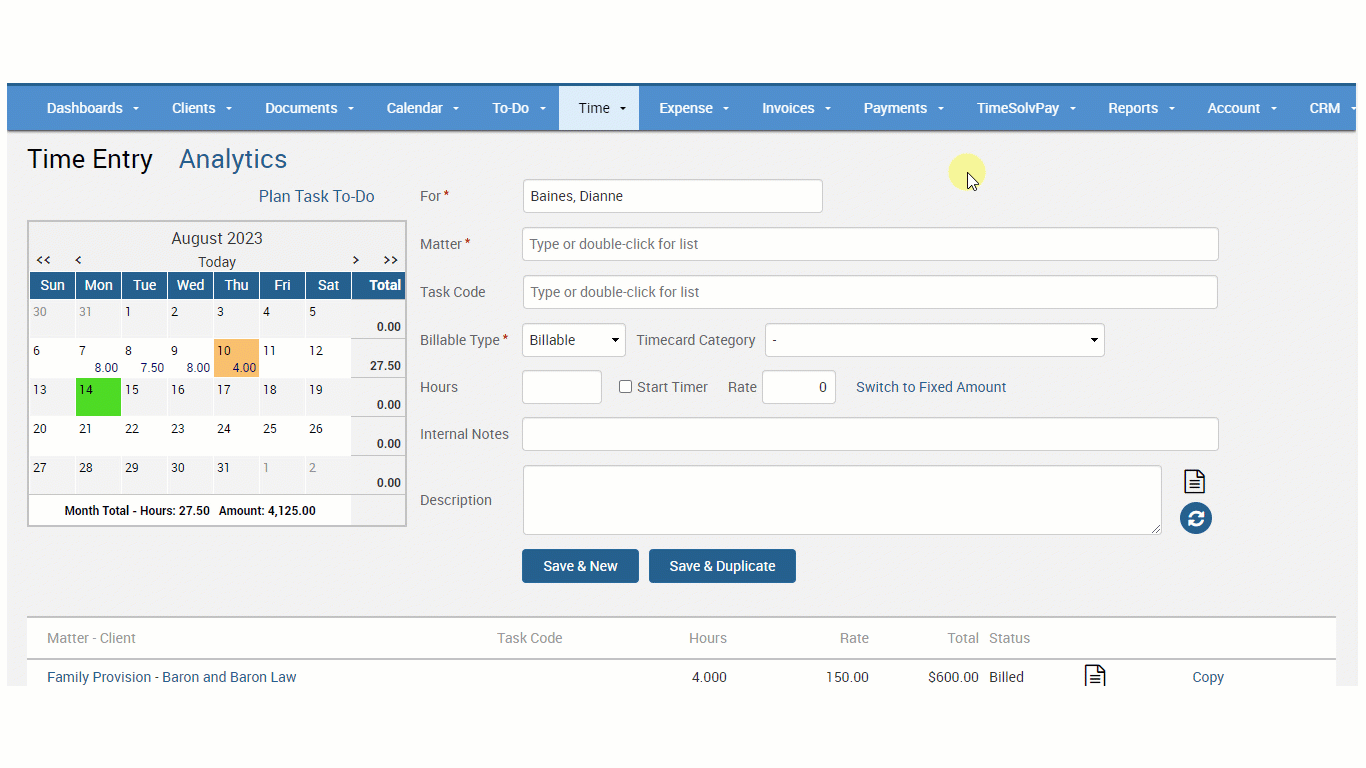
Click on Invoices>Drafts.
Click on New Draft Invoices link to create a new invoice.
Create For – select the required client and matter from the list. Users can filter the list down from All Clients and All Matters to My Matters and Responsible Staff Member. Invoices will only get generated for Clients-Matters that don’t already have an invoice generated against them (i.e. un-billed entries).
Billing Category – generate invoices for a specific billing category. These categories are created under the Client>Settings>Billing Categories tab.
Date Range – the dates entries were created. Leaving it blank will allow you to bill as far back as possible.
Invoice Date – date to generate an invoice on. This will default to the current day.
Include –
Matter billing arrangement – whatever settings are at the Matter level (Clients>Clients & Matters>Matter Name>Invoice Settings>Billing Arrangement) will determine how the draft invoice is created. For example, if the setting at the Matter level specifies ‘Expenses only’, upon selecting ‘Matter Billing Arrangement’ here, you will only generate an invoice for Expense entries.
Time & Expense – generate invoices for both time and expense entries. This will override any Matter-level invoice settings.
Time only – generate invoices for only time entries. This will override any Matter-level invoice settings.
Expense only – generate invoices for only expense entries. This will override any Matter-level invoice settings.
Split – if selected Client-Matters are the ‘Master Matter’, i.e. part of a Split Billing Project, select the Split checkbox to split those entries.
Note: we generally recommend you do not split the entries/invoice in the first draft invoice (i.e. review the draft invoice first, make any edits if necessary to the time/expense entries, void the draft invoice, and issue it again with the Split checkbox selected when you are confident the entry details are accurate). This is to make it easier for you to view the invoice and make any necessary changes easily. If you split the invoice and need to make edits, you will have to retrace your steps back and undo split entries first.

The newly created invoices are ready to view under the Invoices>Drafts screen.
View
Status column –  means invoice review is complete
 means the draft details have been viewed
 means the draft has been edited
Split column –
+ sign – the draft invoice which is a part of a Split Billing Project, has been split.
– sign – the matter is part of a Split Billing Project but has not yet been split.
Delivery method –
Printer – will download a PDF of the invoice
Email – will email a copy to the client and will CC the firm’s address
AutoMail – TimeSolv charges $1.49 per piece, and additional postage as required. No return mailer is included. Invoices on Automail will be sent out just before 17:00 Central Time
Note: Delivery method checkboxes are selected by default depending on your invoice settings at the Matter level. Any changes made on this screen will only be effective for this single invoice. If you want to save these settings for all future invoices for a specific Client-Matter, visit Clients>Clients&Matters>[matter name]>Invoice Settings.
Document icon – to view a summary of the invoice. This icon will only appear for consolidated invoices.
Magnifying glass icon – to preview the invoice without downloading.
Download
There are multiple ways to download a single invoice:
1. Click on the download icon on the far right of the appropriate invoice row.

2. Select the checkbox against invoices and click on the Download button at the top right of the screen. Select the download format as ‘Zip’ to download each invoice into a separate PDF file. This is useful when you need to email out invoices yourself and sort downloaded invoices into Client-Matter folders and sub-folders.

When downloading Invoices, you can opt to select the Firm View or the Client View version of the invoice. Clicking the download button at the top of the screen or the download icon at the end of the invoice entry opens a popup dialog. You can select the desired view and download the invoice.

If the Firm does not have the Firm View/ Client View set up, the download dialog will only display the Format selector.
To learn how to set up the Invoices to display the Firm View and the Client View, click here on Flexible Billing Template.
Send
Select the checkbox next to the invoice(s).
Click Send button from the top of the screen.
The sent invoice will now appear under Invoices>Sent.
Void
Select the checkbox next to the invoice(s) to void.
Click the Void button from the top of the screen.
Creating Fixed Fee Invoices
There are several ways to generate Fixed Fee invoices:
 2. Use a Fixed Fee Billable Milestone in a Matter Plan
Click on Clients>Clients & Matters>[matter name]>Invoice Settings.


Creating Split Billing Invoices
Click on Invoices>Drafts.
Click on New Draft Invoices link to create a new invoice.
Note: all the Master and Secondary Matters/Projects that will have draft invoices generated against them will include all other time/expense entries outside of this split billing project, i.e. this step will not only generate a draft invoice for the time/expense entries associated with this split billing project, it will also generate draft invoices for all other un-billed time/expense associated with the Master and Secondary Matters/Projects.
Create For – Choose the ‘Master Matter’ (i.e. the ‘primary Matter’, or the ‘parent Matter’) that you created the split billing project for. All the secondary Matters are under this ‘Master Matter’ in the system.
Billing Category – generate invoices for a specific billing category. These categories are created under
Date Range – the dates entries were created. Leaving it blank will allow you to bill as far back as possible.
Invoice Date – date to generate an invoice. This will default to the current day.
Include –
Matter billing arrangement – whatever settings are at the Matter level (Clients>Clients & Matters>Matter Name>Invoice Settings>Billing Arrangement) will determine how the draft invoice is created. For example, if the setting at the Matter level specifies ‘Expenses only’, upon selecting ‘Matter Billing Arrangement’ here, you will only generate an invoice for Expense entries.
Time & Expense – generate invoices for both time and expense entries. This will override any Matter-level invoice settings.
Time only – generate invoices for only time entries. This will override any Matter-level invoice settings.
Expense – generate invoices for only expense entries. This will override any Matter-level invoice settings.
Split – if selected Client-Matters are the ‘Master Matter’, i.e. part of a Split Billing Project, select the Split checkbox to split those entries.
Note: we generally recommend you do not split the entries/invoice in the first draft invoice (i.e. review the draft invoice first, make any edits if necessary to the time/expense entries, void the draft invoice, and issue it again with the Split checkbox selected when you are confident the entry details are accurate). This is to make it easier for you to view the invoice and make any necessary changes easily. If you split the invoice and need to make edits, you will have to retrace your steps back and undo split entries first.
Once created:
Split column –
+ sign – the draft invoice which is a part of a Split Billing Project, has been split.
– sign – the matter is part of a Split Billing Project but has not yet been split.
Creating Retainer Invoices
The “Retainer Invoices” tab on the Invoices>Settings screen allows users to create and upload custom templates to generate Retainer Invoices. A default template lets you create your Retainer Invoice, and you also have the option to upload a customized Word template.
The Narratives section allows you to add a default message which appears everytime a Retainer Invoice is created and has the following fields:
– Message Text: The text provided here appears as a note on the Retainer Invoice.
– Email Text: The text provided here appears on the email body when the Retainer Invoice is sent to the client.
These fields are also available on the dialog that opens when creating a New Retainer Invoice or Resending an Invoice from Invoices>Retainer Invoices> screen.

To create a custom Word template, download the sample Word file or use your own and add the required Merge Fields. The merge fields added to the Word file will capture and display dynamic content in your Invoice using the values from the Client details, Matter details, Timekeepers, Invoices, etc.
Sample Word file with merge fields:

To create a Retainer Invoice, click on Invoices>Retainers, then click on the New Retainer Invoice link.
Title – type an appropriate name for your Retainer Invoice.
Client – Matter – type or double-click to pull a list to choose from. If you select a Client-Matter for which invoice and payment settings are ‘Email’ and ‘Client Portal’ related, two new checkboxes will appear towards the bottom after having selected the Client-Matter. For your Retainer Invoice to not be sent out directly to the client after hitting Create on this page, you will have to unselect the ‘Send By Email’ checkbox first.
Date – select a date from the calendar.
Retainer Number – this is the reference number for the Retainer invoice.
Retainer Amount – enter the retainer amount to be charged.
Message Text – refers to a line placed on the Retainer. This is NOT the text shown in the email message.
Include From Address – the firm’s address will show on the retainer invoice.
Output Format – specify the format of the file to be attached/downloaded.
Send by Email – when you have the ‘Send by Email’ button checked, you see an ‘Email’ field appear below it to specify the client email address, and the button label changes to ‘Create and Send’.
Allow Online Payment Through Client Portal – If the selected Matter has a stored payment method this checkbox appears allowing the user to process online payment via the client portal.

Users can also achieve the following from the Retainer Invoices screen:
- Preview – a preview icon allows users to preview the retainer invoice.
- Download – Users can download the retainer invoice in different formats.
- Sent – if an email has not been sent (i.e. you create a new Retainer Invoice but leave ‘Send by Email’ unchecked and decide not to send by email) the retainer is created and ready to send out.
- Resend – this applies if the Retainer Invoice was sent out by email. Users will be asked if they want to include the ‘From Address’ and re-specify the recipient email address. The email address it was initially sent to will be prefilled by default but can be edited.
- Void – Clicking on the Void link on the top right corner of the screen voids the Retainer Invoice. A prompt appears to warn the user that this operation cannot be undone.
Consolidate Multiple Matters for Invoicing
Note: If you created any drafts for the client before these changes were made, you will need to postpone and recreate the draft in order to update the client invoice to consolidate.

Creating an Invoice Without dates
Users can create invoices in TimeSolv without a date appearing on them. But it is important to note the ‘Invoice Period‘ dates must still be defined under the ‘General’ tab of the draft invoice. The ‘Invoice Period’ can be unchecked under the ‘Cover Page’ and ‘Main Page’ tabs of the flexible billing template.
Translate an Invoice
For firms that want to translate their invoices:


Select English as the language translating from, and your desired language to translate to.

Hold Billing Until the Next Invoice or Permanently
To completely hold invoicing for a Matter:
Click on Clients>Clients & Matters>[matter name]>General.
Ensure the Hold Billing checkbox is enabled.
Note: Expense or Time entries can be held until the next invoice or permanently.

To hold entries until the next Invoice:
Invoices>Drafts>[amount]>Time
Click Edit next to each entry you wish to hold.

Search the entry you want to hold permanently and click on Edit.
Note: The ‘Edit’ link will only show if the entry is not part of a Split Billing Project that has been split. In that case, you would have to first undo split entries before you can edit the entry.

Send an Invoice

Click on Invoices>Drafts and create a new draft invoice.
Select the checkbox next to the invoice(s) to send, and click the Send button from the top of the screen.
The sent invoice will now appear under the Invoices>Sent screen.
Note: In case of missing details required to send the invoice(s), an error message may appear. Hover over the yellow error triangle symbol to receive an explanation for why the error occurred. As an example, the user may not have selected an invoice delivery method. Click on the invoice amount to edit and resolve the issue.