
Setting Up Invoicing
- Overview of Invoicing and Payments Process
- Firm-wide Invoice Settings
- Client-level Invoice Settings
- Matter-level Invoice Settings
- Flexible Billing Template
- LEDES Invoices
- Split Billing
- Invoice Narratives
- Billing Categories
- Create a Previous Balance
- Set Firm Default or Client-level Currency
Overview of Billing and Payments Process
Generating invoices in TimeSolv is an easy and efficient process. This overview explains the process of generating, editing, and sending bills to your clients.
Creating an Invoice
Generating an invoice requires the selection of just a few criteria. Simply choose the client and date range, and TimeSolv automatically creates a bill that includes all time and expense entries meeting that criteria. An invoice is considered a draft until it is sent to the client; this is important when editing your invoices.
Editing an Invoice
Invoice editing is one of TimeSolv’s most valuable features. Virtually any piece of information related to an invoice can be edited from the Invoices tab. In other words, you do not have to return to the Time, Expense tabs to make changes. TimeSolv automatically retains the original values of all time and expense entries for internal auditing purposes. Permanent changes to client address and contact information can be saved from the Invoices tab and, most importantly, new time and expense entries can be made directly from this page. You can also view an Adobe Acrobat (PDF) version of your invoice.
Sending Invoices
There are several options for sending the invoice to your client, including auto-mail, email delivery, and print/regular mail. After you send an invoice, you can still view it, but no further edits can be made.
Receiving Payments
Once you receive payment from a client, the remittance can be recorded on the Payments tab. You can keep an accurate and up-to-date record of payments and promptly allocate your receipts to the appropriate projects.
Firm-wide Invoice Settings
Invoice Label – select what to call the invoice in the system so it is specific to your business.
Create Statements with Zero Balance – allows statements with a total amount of zero to be created.
Invoice for My Matters only? – restricts invoice creation, viewing, and sending to those matters where the user is designated the Responsible Professional.
Review required to send invoices? – invoice review is required to send invoices. This ensures quality control. Under Invoices>Drafts>Edit Draft screen, the ‘Review Complete‘ checkbox is marked before the invoice is sent out to the recipient.
Default Invoice Contact – the sender address to appear on all the business’s invoices.
Next Invoice Number – this can only be a numerical value. The default starting number is 101. If, for example, your last invoice with your older billing software was 5,029, you can set the next number here to 5,030. When a user voids an invoice draft back to draft but wants that same invoice number back onto the revised draft, this can be set here so that you can reuse that voided draft invoice number. TimeSolv will not repeat the same invoice number twice, so you do not need to worry about overriding existing invoices.
Copy Invoice emails to sender – send a copy of the invoice to the user.
Copy Statement emails to sender – send a copy of the statement to the user.
Update Original Entry – This will edit the original entry when a user edits the entry from the draft invoice view.
Note: Updating Original Entry is not applicable for summarized and split bill entries.
Copy Commissions on Invoice – used to manage the commission structure on the draft invoices, and if required, allow old commission-related information to be retained on finalized invoices.
Enable Interest Only Invoices – useful for when you have no additional time or expense entry to bill for but need to send out interest/outstanding balance from a previous invoice.
Note: You need to have interest activated and set up under Client>Settings>Invoice Settings for this checkbox to apply.
Flexible Billing Templates (Tab) – Click here for information on Flexible Billing Templates settings.
Automail (Tab) – review invoices sent by the delivery option AutoMail. TimeSolv charges $1.49 per piece and additional postage as required. No return mailer is included.
Note: Invoices on Automail will be sent out just before 17:00 Central Time. You can only review them until this time. At 17:00 Central Time, invoices located here will be sent to a third-party sender and cleared from the screen. Any invoices manually removed from here continue to have a sent status, but will not be mailed by the third-party sender.

Client-level Invoice Settings
These can be set up firm-wide under Clients>Settings>Invoice Settings, or under individual clients Clients>Clients & Matters>[client name]>Invoice Settings. Client-specific settings will override any firm-wide settings.
Click on Clients>Settings>Invoice Settings.
Automatically complete milestones and generate invoices – the system will auto-generate invoices against Milestones that have been marked as ‘complete’. By default, this will be turned on. If this option is turned on at the time of generating draft invoices, all the milestones in the invoice date range will be billed out even if their status is incomplete. If this option is turned off when generating draft invoices, then no invoice will be generated.
Default flexible billing template – allows users to specify exactly what information appears on the invoices generated. Invoices can include as much or as little detail as required. Set this up under Invoice>Settings>Flexible Templates.
From address – sender address as to be shown on invoices.
Apply interest – TimeSolv uses both compound and simple interest.
Interest rate – Enter an annual percentage. Your Grace Period and Payment Terms will impact when the interest starts to accrue.
Interest Type – in the case of Simple, interest will always be calculated against the principal balance amount. Whereas in the case of Compound, interest will be calculated against the total balance amount (including the interest).
Grace period – Interest is calculated based on the percentage you assign. Interest is assigned at that percentage for anything that is due over their grace period time. If interest is unpaid, it becomes a balanced owed, so you would get charged interest on top of interest because it is calculated on the balance owed.
For example, if your invoices give a 30-day grace period, then no interest is calculated within the first 30 days. On day 31, it would start to calculate interest on the unpaid balance owed at the percentage that you have assigned it.
Payment terms – this is the amount of time you give the client to make the payment. The only way of notifying the client of these payment terms if you wish for them to be aware of it is to make sure the payment terms are written in the next field ‘Payment Terms Text’.
Payment terms text – customize how you want the payment terms information to be displayed on the invoice for clients.
Default invoice delivery
Printer – invoices will be downloaded and printed out.
Email – several email formats are available (see image below), including LEDES.

Automail – TimeSolv can send hard copies of invoices to your clients for a small fee.
Invoice Narratives – different texts that appear in various areas of the invoice document. TimeSolv gives you maximum flexibility when it comes time to create the language and style of your invoice. You can use your Text Editor to format Invoice Email Messages and Statement Email messages, use HTML or Plain Text, upload images, and imbed videos.
Note: Firm-level Narratives can be overridden at the Client, Matter, Draft, and Sent Invoice levels
Note: The ‘Paid Invoice Email Message’ text is used in an email to the customer when the invoice has been paid. A credit card processing vendor must be involved. It does not get sent with manual payment/trust entries.

Matter-level Invoice Settings
Click on Clients>Clients & Matters>[matter name]>Invoice Settings.
Billing arrangement options –
Time and Expense
Time Only
Expense Only
Fixed Fee – Time and Expense
Fixed Fee – Time Only
Event –
On-Demand
Milestone
Automatically Complete Milestone and Generate Invoices – to auto-generate invoices against Milestones that have been marked as ‘complete’. This option will only be visible if the billing event is set as Milestone. By default, firm-level settings will determine whether or not this is enabled under Clients>Settings>Invoice Settings. If this option is turned on at the time of generating draft invoices, all the milestones in the invoice date range will be billed out even if their status is incomplete. If this option is turned off when generating draft invoices, then no invoice will be generated.
Default flexible template – allows users to specify exactly what information appears on the invoices generated. Invoices can include as much or as little detail as required. Set this up under Invoice>Settings>Flexible Templates.
From address – sender address as to be shown on invoices.
Apply interest – Interest can be turned on or off at the client level. An Interest Start Date can be set at the Matter level. TimeSolv uses simple interest.
Interest rate – Enter an annual percentage. Your Grace Period and Payment Terms will impact when the interest starts to accrue.
Interest Type – in the case of Simple, interest will always be calculated against the principal balance amount. Whereas in the case of Compound, interest will be calculated against the total balance amount (including the interest).
Grace Period – This is assigned at the Client level and allows a period of time before interest will accrue (in addition to Payment Terms). For example, if invoices give a 30-day grace period, then no interest is calculated within the first 30 days. On day 31 (if Payment Terms are Upon Receipt), it would start to calculate interest on the unpaid balance owed at the percentage assigned to it. The Grace Period does not show on the invoice.
Payment terms – this is the amount of time you give the client to make the payment. The only way of notifying the client of these payment terms if you wish for them to be aware of it is to make sure the payment terms are written in the next field ‘Payment Terms Text’.
Interest start date – is the date and onwards when the interest starts to accrue.
Payment terms text – customize how you want the payment terms information to be displayed on the invoice for clients.
Discount % – there are instances when invoices are sent without the agreed discount discussed for the matter, or the Timekeeper cannot recall the agreed discount. Users can define matter-specific discount percentages. You cannot apply discounts to Fixed Fee Invoices.
Consolidate matters – If two matters are consolidated and one of the matters has a discount set at the matter level, the discount will be applied to the Matter that has the discount specified against it.
Split Matters – In case of split matters the discount will only be applied to the matter that has the discount set
Invoice delivery
Printer – invoices will be downloaded and printed out.
Email – several email formats are available (see image below), including LEDES.

Automail – TimeSolv can send hard copies of invoices to your clients for a small fee.
Invoice Narratives – different texts that appear in various areas of the invoice document. TimeSolv gives you maximum flexibility when it comes time to create the language and style of your invoice. You can use your Text Editor to format Invoice Email Messages and Statement Email messages, use HTML or Plain Text, upload images, and embed videos.

Flexible Billing Template
This allows users to specify exactly what information appears on the invoices. Invoices can include as much or as little detail as required, and company letterhead and logos can easily be incorporated. Our billing templates allow users to assign different templates to different matters for the same client.
Under Invoices>Settings>Flexible templates select the Flexible Billing Template.
Turning on the Firm View option on the Flexible Template allows Firm Admins to view varying levels of detail in the Invoice Preview when previewing invoices from the Drafts or the Sent Invoices screen. Admins can switch between views to see details as required:
– Firm View: By default, the Firm View is selected on the Drafts Invoices screen, allowing firm admins to preview the Invoice with the full details.
– Client View: By default, Client View is selected on the Sent Invoices screen and allows the Invoice to be previewed with the details that the client sees in the sent bill.

Once enabled, the Firm View dropdown is displayed on the Invoices>Draft/Sent Invoices>Magnifying Glass icon>PDF Preview.

Users can customize what to make available on Global Settings, Cover Page, Main Page, Time, Expense, Statement Page, and Remittance Page.
Global settings options:

Cover page options:

Main page options:

Service (allows the user to separate soft costs from hard costs in the invoice) options:

Time options:

Expense options:

Statement page options: 
Remittance page options: 
LEDES Invoices
For attorneys, having a basic knowledge of LEDES is important, and what is even more important is having legal billing software that effortlessly incorporates the LEDES format. The American Bar Association defines categories for legal time and expenses by UTBMS codes. These codes are required for creating electronic invoices in the LEDES format. This format requires a Task Code and an Activity Code.
In the below example, the user has chosen to show the UTBMS codes for time and expense entries, Statement of Account, and Remittance Section. The user has also chosen to use all options of the Time and Expense Details, and included a Remittance Section with user-defined payment instructions:

TimeSolv Legal generates invoices in LEDES 1998B, LEDES 1998BI V2, and LEDES 2000 format. Since LEDES is a standard format, certain items have to be set up correctly to meet the invoicing requirements.
- Tax ID Setup (required)
Click on Account>Settings>General tab.
Enter Tax ID.

- LEDES Timekeeper ID and LEDES Classification (required)
Click on Account>Professional>[user name]>Profile.
The LEDES Professional ID number must be identical to the ID used on the site you upload to.
Note: Most systems use first initial and last name, e.g. Alice Jackson will be AJACKSON, all in capital letters.
In addition, select the correct LEDES Classification.

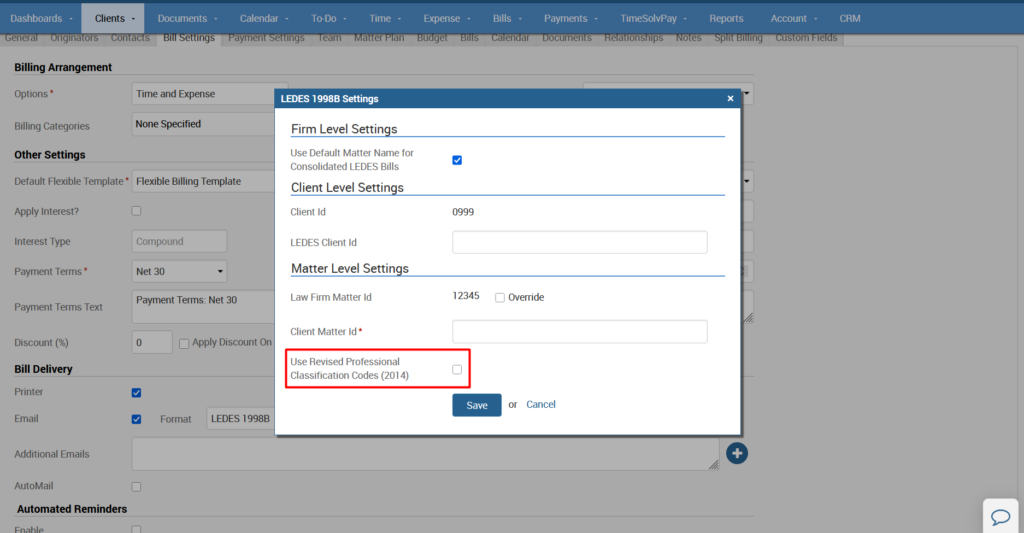
To use the revised timekeeper/professional classification codes for LEDES billing, the Use Revised Professional Classification Codes (2014) option must be enabled at the matter level.
To enable this option, go to Clients > Clients & Matters > [matter name] > Invoice Settings. Under Invoice Delivery, select Email > LEDES, then click Settings. In the LEDES settings window, check Use Revised Professional Classification Codes (2014) under Matter Level Settings, then click Save.
- Task and Activity Codes (required)
Click on Time>Settings>Task Codes/Sub-Task Codes tabs.
Task codes and Sub-Task codes should be ABA-compliant formatted codes in order to be accepted on the website you upload to.

- Timekeeper Hourly Rate (required)
Ensure that the user hourly rate in TimeSolv matches the hourly rate in the invoice submission system.
The user hourly rate would be set under the Account>Professionals>[user name]>Profile tab.
Specify the user’s hourly rate in the Default Rate field.

- Bill Delivery Method (required)
If the vast majority of your clients need LEDES invoices then please follow the steps below:
Click on Clients>Settings>Invoice Settings.
Under Default Invoice Delivery, click on Email>LEDES.
If all matters under a client need invoices to be sent out as LEDES, follow the steps below:
Click on Clients>Clients & Matters>[client name]>Invoice Settings tab.
Under Invoice Delivery, click on Email>LEDES.
If invoices for selected matters need to be sent out as LEDES, follow the steps below:
Click on Clients>Clients & Matters>[matter name]>Invoice Settings.
Under Invoice Delivery, click on Email>LEDES.

Delivery Email Address (not required)
Note: We recommend users go under Invoices>Sent and download the invoice in LEDES format.
Enter your own email address if you have to manually submit LEDES invoices.
You will receive the LEDES invoice in your email.
Download it to your computer and do not change the file type.
Upload this file to the invoice submission system.
If the emails will be automatically delivered to an email address, enter the email address of the receiving invoice submission system.
- Client LEDES ID (not required for all)
Click on Clients>Clients & Matters>[matter name]>Invoice Settings.
Under Invoice Delivery select Email>LEDES.
Click on the Settings button that appears.
Set Client LEDES ID in the pop-up LEDES settings window.

- Client-Matter ID (required)
Note: The unique identifier number is found in the invoice submission system you are using.
This is the unique identifier for the matter and must match between TimeSolv and the invoice submission system.
Click on Clients>Clients & Matters>[matter name]>Invoice Settings.
Click on Invoice Delivery>Email>LEDES>Settings.
Set the Client ID and Matter ID.

Split Billing
Select the Client that is the ‘Master Matter’ for the split billing project – the ‘Master Matter’ is the one in which time and expense entries will be entered before everything is split during the invoicing stage.
Note: Ensure that the ‘Master Matter’ (i.e. the parent Matter) that you are creating the Split Billing Project for is NOT consolidated, as consolidated Master Matters cannot be used in Split Billing. This can be checked under Clients>Clients & Matters>[client name]>Matters>General. The ‘Master Matter’ must also not be a part of any other Split Billing configuration (i.e. it cannot be attached to another Split Billing project as a Secondary Matter).
Click on Clients>Clients & Matters>[matter name]>Split billing.
Step One
Select Split Option:
Split Hours and Amount – hours worked and amount to be billed will be split between all Clients-Matters under this split billing project, according to the percentages assigned to each Client-matter (as shown below).
Split Hours and Calculate Amount – the number of hours worked will be split first, then the total amount to be billed will be calculated according to the percentages assigned to each Client-Matter (as shown below). This is useful for those split billing projects that have various timekeepers with different default rates working on it.

Step Two
Click on the Add Split Billing Project to add the Secondary Matter. You can continue this process to add as many matters to the split billing project as required.
Remainders – at least ONE Matter added to the split billing project MUST have the value ‘Remainder’ assigned to it so that any leftover fraction values are not left unassigned when splitting invoices/bills between multiple clients-matters.
Delete – there will be no warning before deletion. Clicking on the delete link will immediately remove the Client-Matter.
Step Three
Now any time & expense entries made for this ‘Master Matter’ (i.e. primary Matter, or parent Matter) will automatically have those entries assigned to any Secondary Matters listed under the split billing project too. These will be split when you generate an invoice against Master Matter.
Invoice Narratives
Invoice narratives – different texts that appear in various areas of the invoice document. TimeSolv gives you maximum flexibility when it comes time to create the language and style of your invoice. You can use your Text Editor to format Invoice Email Messages and Statement Email messages, use HTML or Plain Text, upload images, and imbed videos.
For firm-wide invoice narratives, click on Clients>Settings>Invoice Settings. Scroll to the bottom.
Click on Clients>Clients & Matters>[client name/matter name]>Invoice Settings. Scroll to the bottom.

Billing Categories
Users can create Billing Categories to help invoice clients in more organized batches. These categories can also be selected when generating reports.
Users can customize the ‘Billing Categories’ label and create new Billing Categories.
Click on Client>Settings>Billing Categories tab.
Click New Billing Category.

Assign these billing categories to clients & matters under Clients>Clients & Matters>[client or matter name]>Invoice Settings.
By default, matters will inherit the Client-level setting.
Note: on consolidated matters, only the client-level Billing Categories will be used.

If a category is not specified for a client or matter, draft invoices will generate for them if the Billing Category is left at ‘None Specified.’
To draft invoices by Billing Category, click on Invoices>Drafts>New Draft Invoices.

Create a Previous Balance
When creating a new invoice for a case, you can include balances from any previously unpaid invoices related to the matter. The advantage of the previous balance method is that you can be assured that all future bills to a client are all-inclusive of any outstanding balance.
Click on Clients>Clients & Matters>[matter name]>Invoices tab.
Enter a Previous Balance amount and Date of the Previous Balance.

To view this previous balance on an invoice, click on Invoices>Settings>Flexible Templates.
Click on the appropriate template name to edit settings.
Under the Global Settings tab, enable Include Total Balance Due on Cover Page and Main Invoice.

You will now be able to see any previous balance on invoices, cover pages, and remittance pages.
Set Firm Default or Client-level Currency
You are able to set the firm default currency under Account>Settings.

You are also able to set a Client-specific currency under the Client>General tab.