
Managing Trust Accounts & Trust Payments
Note: First, ensure Trust Accounting is enabled under Payments>Settings>Enable Trust Accounting.
Create a new Trust account
A Trust account is a great way to manage your client’s funds separately from your Firm’s operating account. Trust accounts are created on a Matter level, and users can have multiple Trust accounts against a Matter.
Transactions made against a Trust account can be viewed from a single screen. To learn more about Transactions, click here on Managing Transactions.
Name – can be changed to anything you want, but by default, it will come up as Trust.
Bank Account – available Bank accounts will be displayed in a drop-down list. Choose the account you would like it to be associated with.
Matter Default? – this account will be used for this Matter.
Replenish Below – enter the minimum value for replenishment. So, if the specified amount drops below its value, the client would have to ‘replenish to’ the amount stated in the Replenish To field. This would automatically appear on their next invoice. You must enter a numerical value above 0.
Replenish To – this means the amount that coincides with any account rules a client has to abide by (for example, a minimal account balance of $1000 is required for clients at all times in their trust account, so the Replenish To field would be $1000.) But, you may allow the client to have as low as $800, for example, before notifying them to add more money to their account.
AutoPay Invoices from this Trust? – if you would like to deduct the invoice amount from the trust account balance automatically.
Active? – ensures the account is active and enabled for use.
Note: you cannot delete a Trust Account if there is anything tied to the account.
Users can view Trust Account details by running a Trust banking report.

![]()
Create a Trust Entry
Click on Payments>Trust.
Client-Matter – the Client-Matter for which the Trust transaction will be made against.
Trust Account – will auto-populate in the Trust Account field if you have a Trust Account set up. If you need to set one up, click on the blue plus sign to create a new one. Creating a new account for a Matter does not create a new bank account, only a dedicated area to track funds specific to this Matter.
Type – Choose between Deposit or Disbursement. Deposit is money entering your account. Disbursement is money taken from the Trust account for anything other than invoice charges (e.g., paying court costs directly from a Trust account or the case has ended, but money is leftover in the Trust, so it is refunded to the Client.) Selecting Disbursement will activate the Paid To field.
Payment Method – choose the Payment Method for this transaction. Choose ACH, Cash, Check, Credit Card, Other, PayPal, Wire Transfer, or Credit Card on File (this option will only appear if the ‘Type‘ field is set to ‘Deposit‘ and the Client-Matter has a Credit Card set up for them).
Paid To – this is mostly used for Disbursement. Enter the name of the customer for whom the balance has to be refunded.
Date – the Date this transaction will be recorded in the Trust account.
Amount – the Amount you are sending out.
Notes – can be used to enter a specific note regarding the transaction. These notes can be edited after you have saved this transaction by clicking on the ‘edit’ link next to the saved Trust transaction.
Reference # – can be used to add a check number.

Once created:
Allocate – click the Allocate link to allocate the funds to invoices (please see the lower half of this article to see how to fill in the allocation form.)
Delete – to remove the entry.
Edit – notes made against a Trust transaction may be edited.
Transfer – transfers an amount from one Trust account to the next.
![]()
Manage Replenishments

Replenish a Trust Account using Credit Card – Manual Entry
Trust Accounts can also be replenished by selecting the ‘Credit Card – Manual Entry.’ For Firms with surcharging enabled on their TimeSolvPay merchant account, the review screen will show the amount payable and the surcharge applied.
The card’s total amount that will be charged is also displayed on the ‘Pay’ button.


![]()
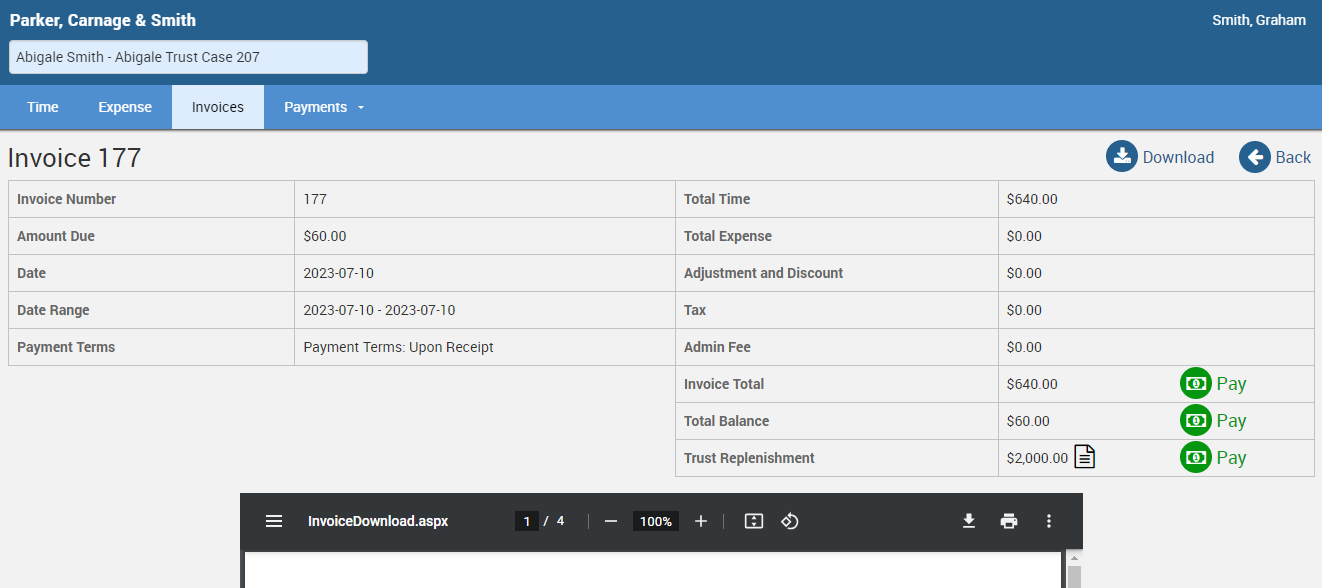
Replenish a Trust Account from the Client Portal
Another way to replenish your Firm’s Trust Account is to pay from the Client Portal. Client contacts who have access to the Client Portal can replenish Trusts from the Portal’s Invoice screen. If the Firm is configured to receive Trust Payments from TimeSolvPay, the Invoices screen will have the option to replenish the Trust account using the Credit Card manual entry and ACH manual entry payment methods.
If the Trust is not configured, the Trust Replenishment option will not be displayed.
![]()
Pay Other Parties and Refunds From a Trust Account
To pay a third party from a Trust Account whose charges are not represented on an invoice or if the balance has to be refunded to the client, click on Payments>Trust and create a disbursement entry against the desired trust or retainer entry:
Click on Payments>Trust.
Client-Matter – the Client-Matter to refund.
Trust Account – will auto-populate with the selected Client-Matter’s default trust account. If another trust account has been configured, users can add it using the plus button.
Type – choose Disbursement.
Payment Method – this will default to ‘Check’ when ‘Disbursement’ is selected.
Date – the date this transaction will be recorded in their account.
Paid To – specify who the refund is for.
Reference – can be used to add a check number.
Amount – amount to refund.
Once saved, the disbursement will be listed as the last entry at the bottom of the screen with all other transactions for that trust account.
Users can also view the disbursement by going under Clients>Clients & Matters>[matter name]>Trust. At the bottom, it will show all the transactions and the disbursement will show up with an ending balance of what is left in the trust account.
To view all transactions within a Trust, run a Trust Banking Report.
Note: ACH – Manual Entry and Credit Card – Manual Entry Payment Method is not supported for LawPay users. Though TimeSolvPay users will be able to make payments using these methods.
The system currently does not support ACH – On File or Credit Card – On File transactions from the Trust screen.
Receive Deposits in your Trust Account using Credit Card – Manual Entry
You can also create retainer entries using the Payments>Trust screen. Select the Trust Account in which to deposit the retainer, select the payment method as ‘Credit Card – Manual Entry,’ and then enter the amount.
Clicking on ‘Save and Charge’ brings up the Credit Card details screen, where you can manually enter your credit card information.

Click on the ‘Review’ button to review the information before processing the transaction.

For firms with surcharging enabled on their TimeSolvPay merchant account, the applicable surcharge amount on the credit card transaction is displayed on the ‘Review Payment‘ screen.
The ‘Pay‘ button also displays the aggregate total that will be charged once you click the ‘Pay‘ button.

![]()
Transfer Trust Funds Between Matter Trust Accounts
*Check under Clients>Clients & Matters>[Matter name]>Invoices tab for a clear view of Payments, Allocations, and Balances.*
Note: Trust Transfers can be performed within a Client’s Matters and not across Clients.
Click under Payments>Trust screen.
At the bottom of the screen, there is a search feature. Ensure the search ‘ Client – Matter‘ field is set as ‘Select All – Balances Only.’ Leave the search dates open. Hit Search.
Next to the Trust payment you want to transfer, click on the downwards arrow next to the ‘ Allocate‘ link and reveal the ‘Transfer‘ link.
A window will pop up, allowing you to specify the Trust transfer details.

![]()
Allocate Trust Payments
*Check under Clients>Clients & Matters>[Matter name]>Invoices tab for a clear view of Payments, Allocations, and Balances.*
Click under Payments>Trust screen.
At the bottom of the screen, there is a search feature. Ensure the search ‘ Client – Matter‘ field is set as ‘Select All – Allocatable.’ Leave the search dates open. Hit Search.
Next to the Trust payment you want to allocate, click on the ‘ Allocate‘ link.

Allocate Oldest First – allocates the entire amount to the unpaid oldest matter.
Compute Equal Proportions – equally distributes payment amount between all matters.
Allocation Date – the date the funds are to be applied to unpaid balances.
Click on the Transfer & Allocate button.
![]()
Voiding Trust Transfers
Let’s say you’ve mistakenly transferred a Trust amount to the wrong Trust account. Follow the steps below to reverse the transfer.
Head under Payments>Trust screen.
At the bottom of the screen, use the search feature to pull up the Trust transfer that you need to void.
In the search result, hit ‘Delete‘ against the listed record of the Trust transfer.

![]()
Delete a Trust Account
To delete a Trust account, any existing Trust transactions would have to be removed either at the firm-level Trust bank account (Payments>Settings>Bank Accounts) or a Matter-level Trust account (Clients & Matters>Matter Name>Trust tab.)
Users can delete Trust accounts under Payments>Settings>Bank Accounts.