
Managing Payments
- Overview of Billing and Payments Process
- Payment Settings
- Store Client-Matter Credit Card/Bank Account/eCheck on File
- Allocating a Payment
6. Transfer Funds from an Operating to a Trust Account
7. Running Payments in Batches for Sent Invoices
8. Enable Payments in the Client Portal
9. Refunds
10. Write Off a Sent Invoice (Partial or Full)
13. Creating Retainer Invoices
Overview of Billing and Payments Process
Generating invoices in TimeSolv is an easy and efficient process. This overview explains the process of generating, editing, and sending bills to your clients.
Creating an Invoice
Generating an invoice requires the selection of just a few criteria. Choose the client and date range, and TimeSolv automatically creates a bill that includes all time and expense entries meeting those criteria. An invoice is considered a draft until it is sent to the client; this is important when editing your invoices.
Editing an Invoice
Invoice editing is one of TimeSolv’s most valuable features. Virtually any information related to an invoice can be edited from the Invoices tab. In other words, you do not have to return to the Time and Expense tabs to make changes. TimeSolv automatically retains the original values of all time and expense entries for internal auditing purposes. Permanent changes to client addresses and contact information can be saved from the Invoices tab, and most importantly, new time and expense entries can be made directly from this page. You can also view your invoice’s Adobe Acrobat (PDF) version.
Sending Invoices
There are several options for sending the invoice to your client, including auto-mail, email delivery, print/regular mail. After you send an invoice, you can still view it, but no further edits can be made.
Receiving Payments
Once you receive payment from a client, the remittance can be recorded on the Payments tab. You can keep an accurate and up-to-date record of payments and promptly allocate your receipts to the appropriate projects.
![]()
Payment Settings
Click on Payments>Settings.
Enable Trust Accounting? – this is only available depending on what type of TimeSolv account package you have. TimeSolv Pro users will not be able to use Trust Accounting.
Show External Trust Transfer Option – allows you to select the payment method as ‘External Trust Transfer’ under Payments>Payments>Payment Method field.
Show all invoices for clients while allocating payments –
Click on the Bank Accounts tab to create/edit/delete bank accounts.
Click to create New Bank Account.
Name – e.g. IOLA, Second IOLTA, Operative.
Type – specify whether this account is a Trust or an Operating account.
Description – helps identify between multiple accounts.
Bank Name – type in your Bank name here
Active – check this box to mark it as an active account
Set as Default for Firm – all payments will be credited to this account by default unless stated otherwise.
Delete – you can only delete an account if nothing in the system has ever been entered against it.
Edit Payment Profile – link your account to your TimeSolvPay/LawPay account. Connect to your merchant account by clicking on the relevant merchant’s link. This will open up a new tab and log you into your selected merchant account. Once logged in, you will be automatically redirected to the TimeSolv web app.

![]()
Store Client-Matter Credit Card/Bank Account/eCheck on File
If you have an agreement with your customers to store their credit card/bank account information on file and charge them whenever an invoice is due, or replenishment to a trust account is required, follow the steps below:
First off, connect a Payment Account to TimeSolvPay or LawPay.
Next, head under Clients>Clients & Matters>[Client or Matter name]>Payment Settings tab. Matters will automatically inherit the Client-level payment settings, but you can have additional/different credit card/bank account details stored under individual Matters.
Click ‘ Enter Credit Card‘ or ‘Enter Bank Account/eCheck.’ A window will pop up, allowing you to enter the relevant credit card/bank account/eCheck details.
You can have a credit card or bank account/eCheck on file. You can only store one of these, i.e., just one payment method for the Client.
The system will use details stored under the Client level if no credit card/bank account information is specified under the Matter level.
Note: Users can receive money through TimeSolvPay/LawPay/AffiniPay using the stored payment method both in Operating and Trust Bank Accounts ONLY if both their Operating and Trust accounts are connected to the same TimeSolvPay/LawPay/AffiniPay account.

Note: Once you’ve saved the credit card/bank account information, the details will be stored in TimeSolvPay/LawPay/Affinipay, not in TimeSolv. If you click ‘delete’ under TimeSolv, it will also delete the payment information from TimeSolvPay/LawPay/Affinipay.
Pay via Credit Card – On File
Once your Credit Card details are saved, you can make payments by selecting ‘Credit Card -On File‘ from the Payments>Payments>Payments & Credits>’Payment Method’ dropdown.
For firms with surcharging enabled on their TimeSolvPay merchant account, the applicable surcharge amount on credit card transactions is displayed on the ‘Review Payment‘ screen.
When making payments against these merchants, clicking on the ‘Save‘ button brings up the review screen with the total amount that will be charged, mentioned on the ‘Pay‘ button.


Pay via Credit Card – Manual Entry
Users who do not have their Credit Card details saved on file can make payments by selecting ‘Credit Card – Manual Entry‘ from the Payments>Payments>Payments & Credits>’Payment Method’ dropdown.
Clicking on the ‘Save and Charge‘ button brings up the Credit Card details screen to make any changes if required.
If surcharging is enabled, the ‘Submit‘ button is replaced by the ‘Review‘ button. Clicking on it brings up the review screen with the amount and the applicable surcharge the Credit Card will be charged.


Once you charge the payment, select the ‘Status‘ as ‘All‘ on the screen, and once you hit the Search button, the Payment should be listed.
The balance should also appear as balance paid under the Invoices>Sent screen.
![]()
Allocating a Payment
*Check under Clients>Clients & Matters>[Matter name]>Invoices tab for a clear view of Payments, Allocations, and Balances.*
Click on Payments>Payments.
At the bottom of the screen, specify the appropriate Client-Matter and set the search status as ‘ Allocatable.’
Click on the Allocate link next to the listed client-matter payment.

Allocate Oldest First – allocates the entire amount to the unpaid oldest matter.
Compute Equal Proportions – equally distributes payment amount between all matters.
Allocation Date – the date the funds are applied to unpaid balances.
Click on the Allocate button.
![]()
Line Item Allocations
Users can create line item payment allocations under the Payments>Payments screen.
Towards the bottom, search ‘Allocatable‘ payments.
Click on the ‘Allocate‘ link on the far right of the payment line.
A pop-up window appears with the ‘Line Item Allocations‘ link against each invoice listed. Clicking on that will access the line item allocations screen.

Note: This screen is independent of payment processing. Allocations occur after you have received the payment, the amount is in the system, and it is ready to be distributed to the different components of an invoice.
Under the line item allocations screen, payments are divided into multiple buckets. Each bucket has its own payment allocated by default, based on its old amount.
There is a specific order in which the payments are allocated to the different components of the invoice. The default waterfall allocation order the system uses is the following:
- Tax 2
- Tax
- Expense Entries
- Interest
- Time Entries
While the system will assign payment allocations for you in the order above, users can override them.
For example, suppose you edit the ‘Time’ amount allocation. In that case, the system will adjust the rest of the amounts according to the sequence specified above after you click on the ‘Recalculate‘ button on the top right.
Note: An ‘Available Funds’ amount is shown on the top right of the screen. If, for example, that figure shows $190, but you try to allocate $200, you will get an error message requesting you to reconcile the amounts. You cannot go above the outstanding amount for the invoice.
You can revert to the default system allocations by clicking on the reset icon against the payment bucket you adjusted, allowing you to revert to the original system-generated allocations.
RESTRICTION: When users override allocations at a higher level, you can no longer make changes at the lower level.
For example, if you allocate at the Expense level, you cannot adjust payments of Interest/Time, etc.
Likewise, if you allocate an amount to a Timekeeper, you cannot then specify amounts for a specific Expense Entry under that Timekeeper as that is a lower-level allocation.
All entries under each Timekeeper will be available, and each amount will be distributed as per their allocation amount.
Note: The Revenue & Commissions report will be consistent with what you see on the line item allocations screen.
![]()
Delete Previous Allocations and Re-Allocate
For payments that have automatically allocated payments to invoices, for example, a payment processed via TimeSolvPay, users can delete those auto-allocations and use the line item allocation screen to distribute appropriately.
To do this, under Payments>Payments screen, towards the bottom of the screen, search the ‘Status’ as ‘Allocated.’

Against the payment, click on the ‘Reallocate‘ link.
This will allow you to delete the previous allocation.
 Once deleted, you will automatically see the allocations pop-up appear with the option of the ‘Line Item Allocations‘ link against the invoices.
![]()
Re-Allocating Payments
Users can quickly reallocate a payment that’s been mistakenly allocated elsewhere.
To reallocate a payment, click on the Payments>Payments tab.
Towards the bottom of the screen, search for ‘ Allocatable‘ payments. Ensure the appropriate range of dates is selected in the ‘View‘ field, and if known, select the Client-Matter, too, so it’s easier to whittle results down.
Click on the ‘Reallocate‘ link next to the appropriate result showing which payments can be reallocated. You will then be able to choose which payment allocations (if not all) to delete, and once deleted, the screen will change to a payment allocation screen. You can now choose and save the updated payment allocation details.

![]()
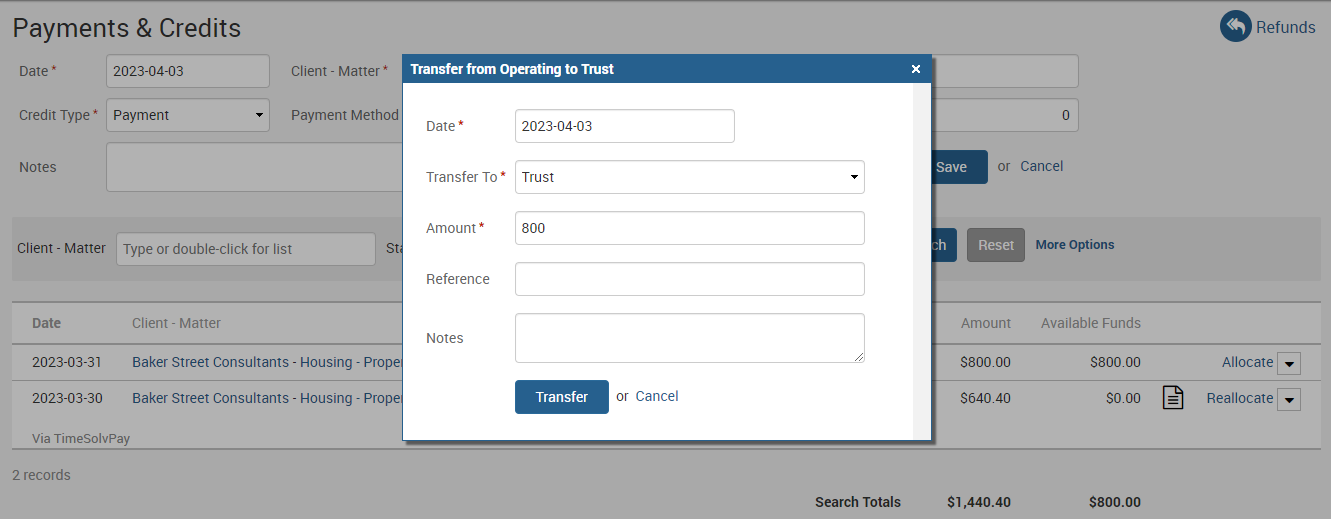
Transfer Funds from an Operating to a Trust Account
TimeSolv allows Payments to be transferred from an Operating Account to a Trust Account using the ‘Transfer’ option provided in the pop-up next to the Allocate/Reallocate link at the end of the entry.

Clicking on the ‘Transfer’ link opens a new dialog to specify details like the date of transfer, the account to which it will be transferred, and to add notes, etc.
A user can Transfer funds from allocated or unallocated payments if a balance amount is available for transfer.
Click on the ‘Transfer’ button to transfer the amount to the selected Trust account.
The ‘Trust Transfers’ are shown in a separate tab, ‘Previous Transfers’, on the ‘Allocate Credit’ pop-up when the ‘Allocate’ link is clicked from the Payments & Credits screen.

When a user clicks the paper icon against line items, the Transfers are shown in a separate table below the Allocations.

Filtering the search on ‘Group by Client’ on the Trust screen shows the transferred amount as a credit and identifies them as ‘Transfer from Operating.’
A user can also ‘Undo’ a Trust Transfer from this screen. A confirmation message appears, and the amount is removed from the Trust Account and returned to the original Operating Account.

Note: Payments can be voided from the ‘Payments and Credits’ screen, but if a Trust Transfer has taken place, it must be undone before the Payment can be voided.
![]()
Running Payments in Batches for Sent Invoices

You’ve now been paid. If an invoice is not paid, a yellow warning triangle will appear that, when hovered over, will tell you the issue, like an expired credit card, for example.
![]()
Enable Payments in the Client Portal
Payments can be received via ACH and credit card. TimeSolvPay provides a seamless process. Click here how to register.
With the Client Portal, clients can independently view invoices, payment histories, trust balances, and details of work in progress, allowing you to focus on other areas of your business.
To charge payments via the Client Portal so that your Clients can pay you directly via TimeSolvPay, click under Clients>Clients & Matters>[Client name]>Contacts>Edit link against the Contact.
Scroll to the bottom of the screen and click on ‘ View Portal.’ This will automatically log you into the Client Portal and out of TimeSolv.
Under the ‘Invoices‘ tab, click on the checkbox against the invoice you want to be charged. Ensure the payment amount is accurate under the ‘Payment‘ column, as this amount will be locked once you click on the ‘Pay‘ button on the top right of the screen.
Payment details can be saved, so you do not have to enter details again for future payments.

Once you charge the payment, log back into your TimeSolv account and click on the Payments>Payments screen. At the bottom of the screen, select the ‘Status‘ as ‘All‘, and once you hit the Search button, the Payment should be listed.
The balance should also appear as balance paid under the Invoices>Sent screen.
![]()
Refunds
The client balance should be in the Trust Account for most law firms.
The following are three different situations related to issuing credits back to the client if the funds are currently located within an operating account, i.e., the Payments tab:
Note: Any refunds processed in TimeSolvPay/LawPay will take up to 24 hours for the payment to be removed in TimeSolv. The voided or refunded payments from TimeSolvPay/LawPay are automatically adjusted in TimeSolv. They are either deleted or allocated against a Refund entry.
1. The Client Underpays an Invoice – Credit the Unpaid Amount
- The work is completed, and the total invoice amount is $10,000. However, for whatever reason, the client remits the payment of only $9,500, which is entered in Timesolv as Credit Type – ‘Payment’ and Payment Method – ‘Check’.
How is the difference of $500 handled? In this situation, enter a new payment as Credit Type – ‘Credit Memo’ and Payment Method – ‘Internal’ for $500. Once this new payment has been saved in Timesolv, allocate it against the remainder of the original $10,000 invoice that the client did not pay in full.
In the next two scenarios, the client has overpaid by $500 for a total of $10,500.
2. The Client Overpays an Invoice – Apply Payment to Future Invoices
- This is similar to scenario one above, except it is agreed that a $500 credit should be applied to the next month or future bill. In that case, there is no need to do anything different or special in Timesolv: the $500 will show as unallocated credit when the next invoice is generated and will be subtracted from the total amount owed by the client. A $500 credit can be allocated against the new invoice at any time after the invoice has been sent (i.e., an invoice number exists).
3. The Client Overpays an Invoice – Issue and Track a Client Refund
Click on Payments>Payments screen.
Select ‘Refunds‘ on the top right of the screen.
A list of refundable payments will appear. When clicking the Refund link on the Refundable Payments tab, the resulting dialog dynamically displays ‘Refund’ or ‘Void’ depending on the Transaction’s settlement status.
The next topic explains how transactions that carry a surcharge will only show the ‘Void’ button on the pop-up.


Refunds on Amounts that Include Credit Card Surcharge
Credits can be issued back to the client if the funds are currently located within an operating account, i.e., the Payments tab.
For surcharged transactions, the entire amount that includes the surcharge gets refunded to the customer.
For instance, if the original transaction amount is $100 and the surcharge is $3.0, the total amount paid by the customer will be $103.0. In this example, the $103.0 will be refunded to the customer, and the merchant will have $100 taken out of their bank account.
Once a user has applied for a refund, the Refund Amount field is disabled to prevent edits, and a note is displayed indicating that this is a surcharged transaction and can only be voided.


![]()
Write Off a Sent Invoice (Partial or Full)

![]()
Clear a Duplicate Payment
If you have mistakenly posted a payment twice, follow the steps below to clear one of the duplicate payments:
Click on Payments>Payments.
At the bottom of the screen, fill in the search criteria as follows:
Client – Matter – specify who the duplicate payment is under.
Status – select ‘All’.
View – select ‘Other’.
Click on More Options.
Date range – of the duplicate payment.
When the user clicks ‘search’, a list of payments for the specified Client-Matter will show up for the date range selected.
Click Void next to the duplicate payment you want to clear.

![]()
Create a Previous Balance
When creating a new invoice for a case, you can include balances from any previously unpaid invoices related to the matter. The advantage of the previous balance method is that you can be assured that all future bills to a client are all-inclusive of any outstanding balance.
Click on Clients>Clients & Matters>[matter name]>Invoices tab.
Enter a Previous Balance amount and Date of the Previous Balance.

To view this previous balance on an invoice, click on Invoices>Settings>Flexible Templates.
Click on the appropriate template name to edit settings.
Under the Global Settings tab, enable Include Total Balance Due on Cover Page and Main Invoice. You will now see any previous balance on invoices, cover pages, and remittance pages.
You can also provide Clients with a grid view of all their Aged Accounts Receivable. These grids can be included on the Cover Page, Main Invoice Page, Statement Page, and Remittance Page. Just head under Invoices>Settings>Flexible Templates tab. Open up an existing template or create a new ‘Aged Accounts Receivable’ template and check the ‘Accounts Receivable Aging’ checkbox under each appropriate page tab.

This is how the grid will appear on the invoices:

![]()
Creating Retainer Invoices
Click on Invoices>Retainers.
Click on New Retainer Invoice.
Title –
Client – Matter – type or double-click to pull a list to choose from. If you select a Client-Matter for which invoice and payment settings are ‘Email’ and ‘Client Portal’ related, two new checkboxes will appear towards the bottom after selecting the Client-Matter. For your Retainer Invoice to not be sent out directly to the client after hitting Create on this page, you must unselect the ‘Send By Email’ checkbox first.
Date – select a date from the calendar.
Retainer Number – this is the reference number for the Retainer invoice.
Retainer Amount – enter the retainer amount to be charged.
Message Text – refers to a line placed on the Retainer. This is NOT the text shown in the email message.
Include From Address – the firm’s address will show on the retainer invoice.
Output Format – specify the file format to be attached/downloaded.
Note: Clicking on Create will send the Retainer Invoice directly to the client if the ‘Send By Email‘ checkbox is selected. It will NOT download for you to review first unless you have it selected for Print.
