
CRM/LawRuler Integration
Set Up LawRuler
LawRuler is a fully-featured law firm with legal case management and intake software features, allowing firms to track leads, grow prospects, and gain clients.
To sign up for LawRuler, please get in touch with TimeSolv support because this feature requires an additional charge.
Once the feature is enabled for the firm, navigate to CRM>Settings tab to get started.
NOTE: In order to use our CRM (by LawRuler) integration feature, you must be a paid firm. Firms using a free trial account cannot register.
Only TimeSolv Admins can initiate CRM (by LawRuler) integration.
Clicking on the CRM>Settings tab from the main menu brings up the CRM (by LawRuler) landing page:

The ‘Schedule a Demo‘ button at the bottom opens a new tab and lets the users schedule a time for the demo (links to ‘Book a time | @ (chilipiper.com)‘.)
To get started with the CRM (by LawRuler) integration, click on the ‘GET STARTED‘ button under the CRM screen.
The next screen allows users to select from the monthly or the annual subscription.

Selecting a subscription plan opens the Firm Information screen with the logged-in user’s Firm Information pre-populated.
Click on the Continue button to move on to the next screen.

Note: You must ensure that the correct information is provided in the first instance. Updating the information in CRM will not sync information in TimeSolv.
At this point, the CRM (by LawRuler) instance is ready to use, and the user is presented with a welcome screen to either Launch CRM (by LawRuler) or Setup Users.

This will create a CRM (by LawRuler) for the firm and a user for the CRM with the TimeSolv login credentials. This is the user who initiated the integration.
If the user chooses to select the ‘Setup Users’ button on the Welcome screen, the user will be taken to the TimeSolv CRM ‘Settings‘ screen, and a message will be displayed at the top informing the user that CRM is being configured.
NOTE: It may take a while for some firms before CRM is accessible for the first time upon registering.

If there are any errors in the user information, the system will display the appropriate message.
The user can then launch CRM (by LawRuler) from within TimeSolv by clicking on the CRM drop-down from the top menu and clicking on the CRM>Launch link. CRM (by LawRuler) opens in a new window.
Select the default landing screen on the CRM portal the first time you log in. This is the screen shown each time you log into CRM (by LawRuler).

![]()
Create New Intakes
Click on the ‘New Intake’ link from the far-left menu column to open the New Intake Wizard. This allows the firm to create new client intakes in CRM and push them into TimeSolv for logging Time, Expense, and Billing against them.
The list of TimeSolv users will be pre-filled in the ‘Assignee’ list.
Once a new lead has been created, the user will see a ‘Billing TimeSolv’ option on the left-hand column menu. When you click on this, you will see the process of the system exporting the lead into TimeSolv.
The system will check for any primary contact duplications during this process. If a client conflict exists, a message will appear, and you will be given the option to update the name of the client.

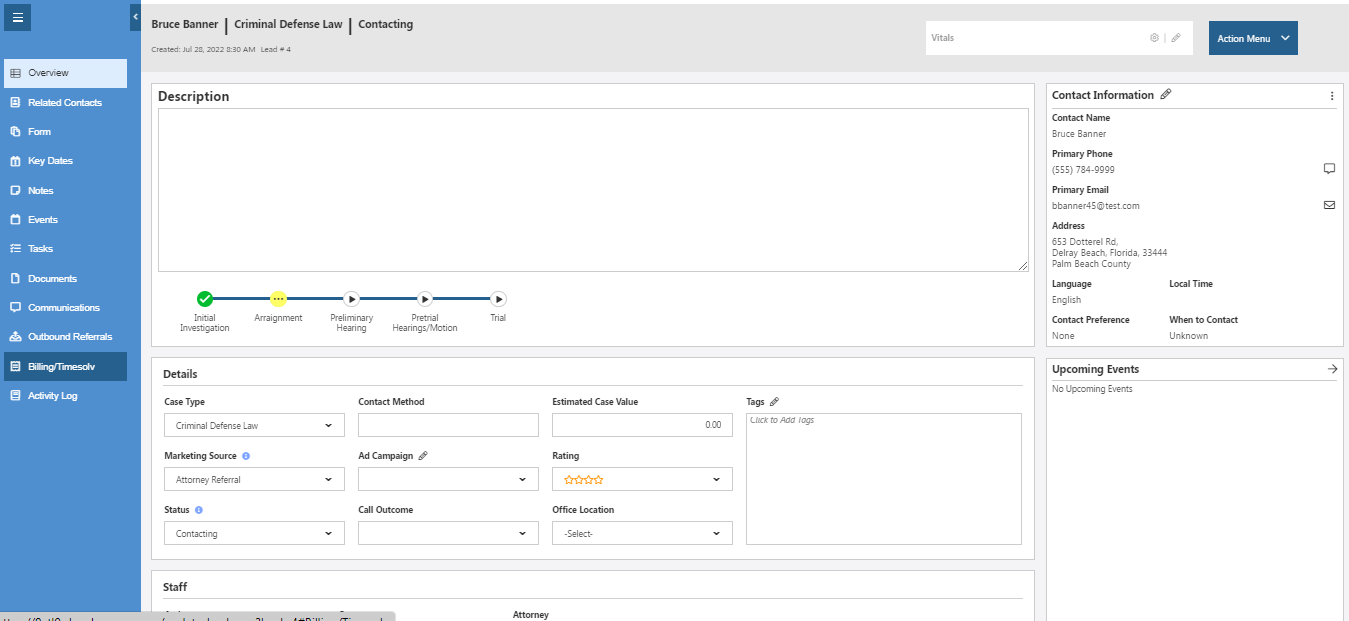
If the user is viewing an existing Client and clicks on ‘Billing/TimeSolv’ in CRM (by LawRuler), the Matter Details screen for the selected client opens in a new tab in the TimeSolv application.
![]()
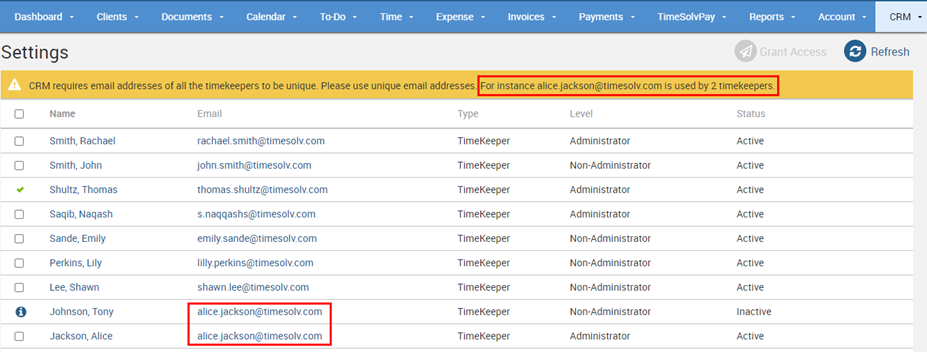
CRM Settings
To access the CRM setting screen, navigate to CRM>Settings in TimeSolv.
This screen will show you a list of existing users for your firm. Admin users in TimeSolv will be granted Admin access in CRM too.
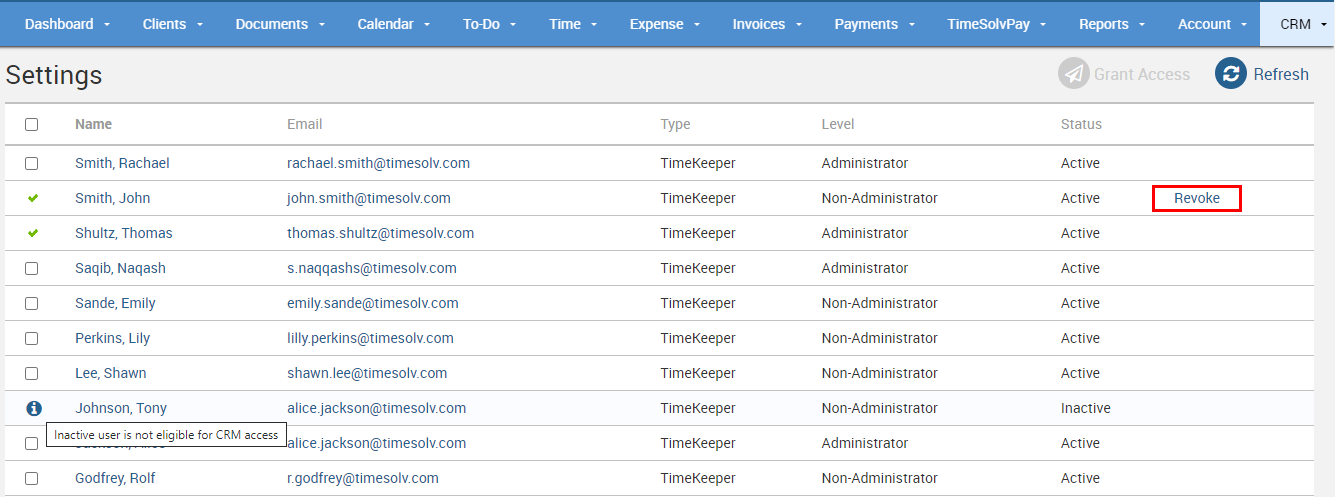
Granting CRM Access
CRM Admins can grant access to users by selecting a user from the list and clicking on the ‘Grant Access’ button on the top right side of the screen
Inactive users will also be shown in this list with a blue circle with an ‘i’, but they cannot be granted access to CRM. Hovering over the icon brings up a tooltip with the message ‘Inactive user is not eligible for CRM access.’

Clicking on the checkbox replaces the checkbox with an animated icon showing revolving dots and a message displayed at the screen’s top.
Hovering over the icon also displays a tooltip, ‘Grant Access Pending.’

Users with a checkmark against them are those that have been successfully granted access to CRM.
Revoke CRM Access
Under the CRM>Settings screen, click on the ‘Revoke’ link against the user.
NOTE: The Admin user that initiated the connection for the firm between TimeSolv and CRM (by LawRuler) cannot have access revoked.
A confirmation pop-up will appear. Once you click ‘OK’ to confirm, note that this process may take some time to complete.
An email will inform the Admin user that access has been successfully revoked for the said user.
Additional Resources on LawRuler
For further details on how to use CRM (by Law Ruler), refer to this link.