
Clients & Matters Billing Set Up
- Client & Matter Invoice Settings
- Consolidate Matters for Billing
- Create and Edit Global Rates
- Client Trust Accounting
- Client or Matter Payment Settings
- Split Billing Projects
- Billing Categories
- Enable interest for a Client
- Client & Matter Account Groups
Client & Matter Invoice Settings
Client-level Invoice Settings
These can be set up firm-wide under Clients>Settings>Invoice Settings or under individual clients Clients>Clients & Matters>[client name]>Invoice Settings. Matter-specific settings will override client settings, and Client-specific settings will override firm-wide settings.
Click on Clients>Settings>Invoice Settings.
Automatically complete milestones and generate invoices – The system will auto-generate invoices against Milestones (fixed fee invoices) with a date equal to or before the drafting date. By default, this will be turned on. If this option is turned on when generating draft invoices, all the milestones in the invoice date range will be billed. If this option is turned off when generating draft invoices, the milestone invoice will not be generated. That would require manually generating the invoice by clicking Complete and Generate Invoice on the Matter Plan tab.
Default flexible billing template – This template will be used for all new matters and can be changed at the matter level. Templates can be customized to include as much or as little detail as required and can be set up at Invoice>Settings>Flexible Templates.
From address – This sender address will be used for all new matters and can be changed at the matter level. The addresses that show here are fed from Account, Our Account. The firm main address is located on the Our Account tab. Additional remittance or branch addresses can be set up on the Additional Contacts tab.
Apply interest – Interest can be turned on or off at the client level. An Interest Start Date can be set at the Matter level. TimeSolv uses simple interest.
Interest rate – Enter an annual percentage. Your Grace Period and Payment Terms will impact when the interest accrues.
Interest Type – in the case of Simple, interest will always be calculated against the principal balance amount. Whereas in the case of Compound, interest will be calculated against the total balance amount (including the interest).
Grace period – This is assigned at the Client level and allows time before interest will accrue (in addition to Payment Terms). For example, if invoices give a 30-day grace period, no interest is calculated within the first 30 days. On day 31 (if Payment Terms are Upon Receipt), it would start calculating interest on the unpaid balance owed at the percentage assigned. The Grace Period does not show on the invoice.
Payment terms – This can be modified at the Client or Matter levels and allows time before interest will accrue (in addition to the Grace Period). While the default language will feed into the Payment Terms Text area based on the choice made here, it can be customized. The Payment Terms can be shown on the invoices (template, Main tab).
Payment terms text – customize how you want the payment terms information to be displayed on the invoice for clients.
Default invoice delivery:
Printer – Depending on your browser settings, a dialogue box will be presented on the screen so the user can decide to save, print, or discard the invoice.
Email – several email formats, including LEDES, are available (see image below).

Additional Emails – Add any additional email addresses to which you need the invoices delivered.
Automail – TimeSolv can send hard copies of invoices to your clients for a small fee.
Invoice Narratives – different texts that appear in various areas of the invoice document. TimeSolv gives you maximum flexibility when it comes time to create the language and style of your invoice. You can use your Text Editor to format Invoice Email Messages and Statement Email messages, use HTML or Plain Text, upload images, and imbed videos.
Note: The ‘Paid Invoice Email Message’ text is used in an email to the customer when the invoice has been paid. A credit card processing vendor must be involved. It does not get sent with manual payment/trust entries.

![]()
Matter-level Invoice Settings
Click on Clients>Clients & Matters>[matter name]>Invoice Settings.
Billing arrangement options – Matters can be set to bill in specific ways. The usual hourly bill would be Time and Expense (On-Demand). Perhaps you have a contingent matter and want to bill the expenses only… you can do that.
Time and Expense
Time Only
Expense Only
Fixed Fee – Time and Expense (expenses included in the amount)
Fixed Fee – Time Only (client pays the expenses)
Event –
On-Demand – these matters will be listed when you create new draft invoices.
Milestone – these matters will not be listed when you create new draft invoices.
Checkmark the ‘Automatically Complete Milestone and Generate Invoices‘ box if you want the system to auto-generate Milestone invoices (fixed fee invoices) with a date equal to or before the drafting date. This option will only be visible if the billing event is set as Milestone. By default, firm-level settings will determine whether this is enabled under Clients>Settings>Invoice Settings. If this option is turned on when generating draft invoices, all the milestones in the invoice date range will be billed. If this option is turned off when generating draft invoices, the milestone invoice will not be generated. That would require manually generating the invoice by clicking Complete and Generate Invoice on the Matter Plan tab.
Default flexible template – This template will be used for this matter, overriding the client and firm default template choices. This allows users to specify exactly what information appears on the invoices generated. Invoices can include as much or as little detail as required. Set this up under Invoice>Settings>Flexible Templates.
From address – This sender address will be used for all new matters and can be changed at the matter level. The addresses that show here are fed from Account, Our Account. The firm main address is located on the Our Account tab. Additional remittance or branch addresses can be set up on the Additional Contacts tab.
Apply interest – Interest can be turned on or off at the client level. An Interest Start Date can be set at the Matter level. TimeSolv uses simple interest.
Interest rate – Enter an annual percentage. Your Grace Period and Payment Terms will impact when the interest accrues.
Interest Type – in the case of Simple, interest will always be calculated against the principal balance amount. Whereas in the case of Compound, interest will be calculated against the total balance amount (including the interest).
Grace Period – This is assigned at the Client level and allows time before interest will accrue (in addition to Payment Terms). For example, if invoices give a 30-day grace period, no interest is calculated within the first 30 days. On day 31 (if Payment Terms are Upon Receipt), it would start calculating interest on the unpaid balance owed at the percentage assigned. The Grace Period does not show on the invoice.
Payment terms – This can be modified at the Client or Matter levels and allows time before interest will accrue (in addition to Grace Period). While the default language will feed into the Payment Terms Text area based on the choice made here, it can be customized. The Payment Terms can show on the invoice (template, Main tab).
Interest start date – Designate when interest starts for any given matter.
Payment terms text – Customize how you want the payment terms information to be displayed on the invoice for clients.
Discount % – Establish a discount at the time of matter creation.
Consolidate matters – If two matters are consolidated, and one of the matters has a discount set at the matter level, the discount will be applied to the matter that has the discount specified against it.
Split Matters – In the case of split matters, the discount will only be applied to the matter with the discount set.
Note: You cannot apply discounts to Fixed Fee invoices.
Invoice delivery
Printer – – Depending on your browser settings, a dialogue box will be presented on the screen so the user can decide to save, print, or discard the invoice.
Email – several email formats are available (see image below), including LEDES.
Format – Users can have their LEDES files generated in LEDES 1998B, LEDES 1998BI V2 or the LEDES 2000 format which are based on the old standard. When downloading the LEDES file using the LEDES 1998B or the LEDES 1998BI V2 format from Invoicing>Sent Invoices screen, LEDES Classifications assigned to the Timekeeper appear as a two-character code. While the downloaded file for LEDES 2000 displays the full name of the classification.
Using the Timekeeper Classification Codes – 2014, the downloaded LEDES files, irrespective of the format used, displays the classification codes in a consistent and standard 5-to-6-character format. The new standard also allows a wider set of LEDES Classifications to be selected and assigned to the Timekeepers.
In TimeSolv, this feature is configurable at the Matter-level and is turned off by default. To turn it on, head on to Matter Details>Invoice Settings>Invoice Delivery>Format dropdown list. Select a LEDES format and open the popup window using the Settings button. Checking the checkbox for “Use Revised Timekeeper Classification Codes (2014)” towards the bottom enables the new classifications for the Matter.
Note: If the Firm is using the old standard and selects one of the new classifications which were not present before, the downloaded LEDES file will show the classification as “OT,” using the two-character format to comply with the older systems.
Firms that have the Classification Codes (2014) turned on, will see the 5 or 6-character code in the downloaded file.

Additional Emails – Add any additional email addresses to which you need the invoices delivered.
Automail – TimeSolv can send hard copies of invoices to your clients for a small fee.
Invoice Narratives – different texts that appear in various areas of the invoice document. TimeSolv gives you maximum flexibility when it comes time to create the language and style of your invoice. You can use your Text Editor to format Invoice Email Messages and Statement Email messages, use HTML or Plain Text, upload images, and imbed videos.
Note: The ‘Paid Invoice Email Message’ text is used in an email to the customer when the invoice has been paid. A credit card processing vendor must be involved. It does not get sent with manual payment/trust entries.

![]()
Consolidate Matters for Billing
Merging multiple Matters onto one single invoice means you save time and costs.
Click on Clients>Clients & Matters>[client name]>Matters.
Select the Consolidated? checkbox against the desired matters.
The Consolidate Invoice Groups allows Firms to group Matters when creating consolidated billing. Matters can be associated with one of the groups created from the Consolidated Invoice Groups tab, and these consolidated Matters appear grouped in a separate Invoice when Draft Invoices are generated.
Note: If you created any drafts for the client before these changes were made, you must delete and create the draft again to update the client invoice to consolidate.

![]()
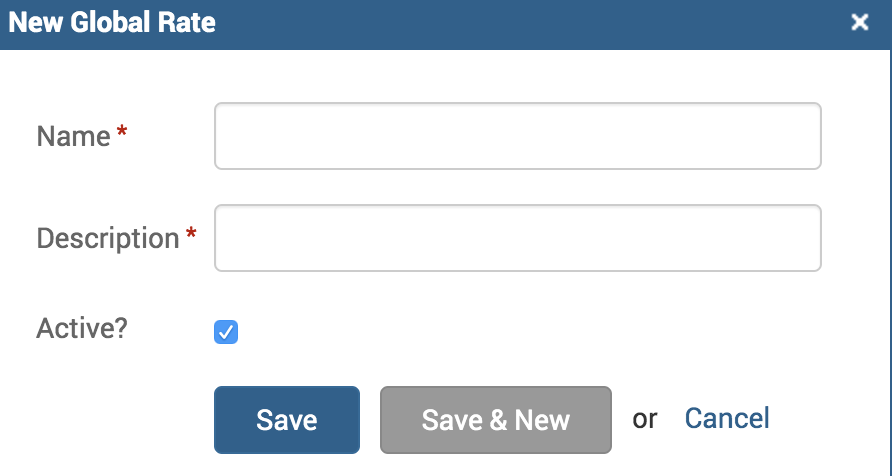
Create and Edit Global Rates
The advantage of using Global Rates is that you can customize your rates for various situations and have them ready to use. Rate examples could be a 10% discount rate, litigation rates, divorce rates, child custody rates, etc. Or, if you have a different rate for specific clients, you can name the rate by the client name to make it easy to assign.
Click on Time>Settings>Global Rates>New Global Rate.
Description – this description is only available when viewing the list of global rates under this tab. When you assign global rates in the clients and matters section, you will only see the name of the global rate, not the description.

Click on the Edit Rates link next to the newly created global rate and fill in the alternative rates against each user. If a rate is not assigned in the right column, the default rate will be used (left column).

![]()
Client Trust Accounting
TimeSolv allows the management of Trust payments easily and quickly. Your firm can even auto-pay invoices from the Trust account and request replenishment funds on an invoice automatically when the Trust falls below the threshold designated. The Trust Banking Report is also very valuable in managing trust funds.
To view Client level Trust settings, ensure Trust Accounting is enabled under Payments>Settings>Enable Trust Accounting.
Click on Clients>Clients & Matters>[matter name]>Trust>New Trust.

Note: If anything is tied to the Trust account, it cannot be deleted. This will create a client sub-container in the firm trust account. To deposit funds in the Trust, go to Payments, Trust, and complete the upper part of the screen. If auto-allocation is not selected, trust funds are manually allocated at the lower part of Payments, Trust.
For Trust Replenish management, click under Payments>Replenish screen, where users can view a list of replenishing amounts for all Clients and Matters.
Users can search for Client & Matters with a Trust account using the Search button.
Clicking on ‘Replenish‘ will generate a pop-up allowing you to specify the Payment Method, Amount, Reference, and Notes.

Client or Matter Payment Settings
If you have an agreement with your customers to store their credit card/bank account information on file and charge them whenever an invoice is due or replenishment to a trust account is required, follow the steps below:
First off, connect a payment account to LawPay. See here for more information.
Next, head under Clients>Clients & Matters>[Client or Matter name]>Payment Settings tab. Matters will automatically inherit the Client-level payment settings, but you can have additional/different credit card/bank account details stored under individual Matters.
Click ‘Enter Credit Card‘ or ‘Enter Bank Account/eCheck‘. A window will pop up, allowing you to enter the relevant credit card/bank account/eCheck details.
You can have a credit card or bank account/eCheck on file. You can only store one of these, i.e., just one payment method for the Client.
The system will use details stored under the Client level if no credit card/bank account information is specified under the Matter level.
Note: Users can receive money through TimeSolvPay or LawPay/AffiniPay using the stored payment method in Operating and Trust Bank Accounts ONLY if both their Operating and Trust accounts are connected to the same merchant account.

Note: Once you’ve saved the credit card/bank account information, the details will be stored in LawPay/Affinipay, not in TimeSolv. If you click ‘delete’ under TimeSolv, it will also delete the payment information from LawPay/Affinipay.
![]()
Split Billing Projects
Select the Client that is the ‘Master Matter’ for the split billing project – the ‘Master Matter’ is the one Time and Expense entries will be entered against before everything is split during the invoicing stage.
Note: Ensure that the ‘Master Matter’ (i.e., the parent Matter) you are creating the split billing project for is NOT consolidated, as consolidated Master Matters cannot be used in split billing. This can be checked under Clients>Clients & Matters>[client name]>Matters>General. The ‘Master Matter’ must also not be a part of any other Split Billing configuration (i.e., it cannot be attached to another Split Billing project as a Secondary Matter).
Click on Clients>Clients & Matters>[matter name]>Split billing.
Step One
Select Split Option:
Split Hours and Amount – hours worked and amount to be billed will be split between all Client-Matters under this split billing project, according to the percentages assigned to each Client-Matter (as shown below).
Split Hours and Calculate Amount – the number of hours worked will be split first, then the total amount to be billed will be calculated according to the percentages assigned to each Client-Matter (as shown below). This is useful for those split billing projects with various timekeepers with different default rates working on it.

Step Two
Click on the Add Split Billing Project to add the Secondary Matter. You can continue this process to add as many matters to the split billing project as required.
Remainders – at least ONE Matter added to the split billing project MUST have the value ‘Remainder’ assigned to it so that any leftover fraction values are not left unassigned when splitting invoices/bills between multiple clients-matters.
Delete – there will be no warning before deletion. Clicking on the delete link will immediately remove the Client-Matter.
Step Three
Any time & expense entries made for this ‘Master Matter’ (i.e., primary Matter or parent Matter) will automatically have those entries assigned to any Secondary Matters listed under the split billing project too. These will be split when you generate an invoice (and click the Split checkbox) for Master Matter.
Timesolv recommends that an unsplit draft invoice for Master Matter be generated first for review and corrections. Once completed, void the draft and regenerate it but click the Split checkbox. The split invoices will be created. While you can edit each of these invoices individually, if you do so, you will not be able to Undo Split Entries – another powerful feature TimeSolv offers.
If you don’t edit the drafts separately and need to put the entries back together, you can do so. You would void the drafts, go to the Matter, Split Billing tab, and click Undo Split Entries in the upper right corner.
![]()
Billing Categories
Users can create Billing Categories to help invoice their clients in more organized batches. These should not be confused with Client Categories which feed into 13 different reports.
Users can customize the ‘Billing Categories’ label and create new Billing Categories.
Click on Client>Settings>Billing Categories tab.
Click New Billing Category.

Assign these billing categories to clients & matters under either Clients>Clients & Mattters>[client name]>Invoice Settings or Clients>Clients & Mattters>[matter name]>Invoice Settings.
By default, matters will inherit the Client-level setting.
Note: on consolidated matters, only the client-level Billing Categories will be used.

If a billing category is not specified for a client or matter, draft invoices will generate for them if the Billing Category is left at ‘None Specified.’
To draft invoices by Billing Category, Click on Invoices>Drafts>New Draft Invoices.

![]()
Enable Interest for a Client
If the client already exists in TimeSolv, first change the firm-level settings to apply interest to all future clients and change the interest settings on each existing client at the client level.
Note: this would be for companies that charge interest for all clients.
TimeSolv uses both compound and simple interest.
In the case of Simple, interest will always be calculated against the principal balance amount.
Whereas in the case of Compound, interest will be calculated against the total balance amount. In short, if interest is unpaid, your clients will be charged interest on top of interest because it is calculated on the balance owed. For example, if your invoices give a 30-day grace period, no interest is calculated within the first 30 days. On day 31, it would start to calculate interest on the unpaid balance owed at the percentage that you have assigned it.
Interest is calculated based on the percentage you assign. Interest is assigned at that percentage for anything due over their grace period.
Click on Clients>Settings>Invoice Settings.
Apply Interest? – Enable.
Interest Rate – the interest rate is based on an annual percentage rate. For example, if you were to charge a 5% annual interest, you would enter 5 in this field. Or, if you wanted to charge 1.5% monthly interest, you would type in 18 (because 1.5 * 12 months of the year = 18).
Interest Type – in the case of Simple, interest will always be calculated against the principal balance amount. Whereas in the case of Compound, interest will be calculated against the total balance amount (including the interest).
Grace Period (days) – This is the amount of provisional time you will allow the client to make a payment beyond the due date before you begin to charge interest (in addition to Payment Terms). This can be overridden at the Client level. For example, if your invoices give a 30-day grace period, no interest is calculated within the first 30 days. On day 31 (if your Payment Terms are Upon Receipt), it would start to calculate interest on the unpaid balance owed at the percentage that you have assigned it. The Grace Period does not show on the invoice.
Payment terms – This can be modified at the Client or Matter levels and allows time before interest will accrue (in addition to Grace Period). While the default language will feed into the Payment Terms Text area based on the choice made here, it can be customized. The Payment Terms can show on the invoice (template, Main tab).
Payment Terms Text – will automatically pre-fill with whatever Payment Terms are selected. But this can be customized to suit your needs. This text box is the only place for you to notify your client of the payment terms, so if you wish, you can write ‘Please pay immediately’ despite having a payment term set up in your back office.

![]()
Client & Matter Account Groups
In TimeSolv, clients can be classified into various account groups. This information feeds into the Client/Matter by Matter Detail report. The payment and account groups are also used for syncing with Account Edge.
Click on Clients>Settings>Account Groups tab.
Click on New Account Groups to create a new group.
