
LexShare & LexSign
LexShare – Getting Started
LexShare is a document-sharing and requesting feature with eSignature capabilities. It allows firms to securely share files, request files, and manage matter-related documents through LexShare.
LexShare is a paid add-on feature. Firms must be enrolled in LexShare before the feature can be connected and used in TimeSolv.
Configure LexShare
To configure LexShare:
- Navigate to Documents > Settings.
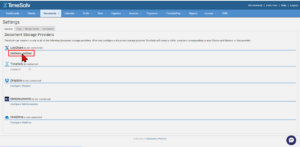
- Under the General tab, locate the Document Storage Providers section.
- If LexShare has not been connected yet, the page will display LexShare is not connected.
-
Click Configure LexShare.
-
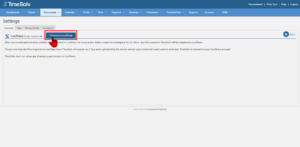
On the LexShare configuration screen, click Connect to LexShare.
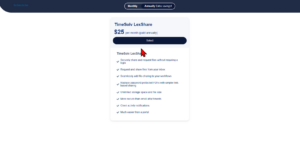
- The user will be redirected to the subscription management page.
-
Select the TimeSolv LexShare add-on.
-
Review the enrollment details on the Confirm Your Enrollment page.
This page displays the selected products, subscription details, license count, billing address, shipping address, and grand total.
-
Click Confirm.
- After confirming enrollment, the user will be redirected back to TimeSolv.
- Once the connection is complete, LexShare will show as connected under Documents > Settings > Configure LexShare.
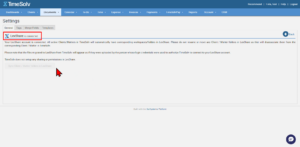
At this point, active Clients and Matters in TimeSolv will automatically have corresponding workspaces and folders created in LexShare.
Important Notes
- Active Clients/Matters in TimeSolv will automatically have corresponding workspaces/folders in LexShare.
- Do not rename or move any Client/Matter folders directly in LexShare. Doing so may disassociate them from the corresponding Client/Matter in TimeSolv.
- TimeSolv does not set up sharing or permissions in LexShare.
- Files migrated from TimeSolv to LexShare will appear as uploaded by the user whose login credentials were used to authorize TimeSolv to connect to the LexShare account.
- The Sync Client/Matter folders in LexShare button may be disabled while the initial configuration or sync is still in progress.
Sync Client/Matter Folders in LexShare
Once LexShare is connected, a Sync Client/Matter folders in LexShare button may appear on the LexShare configuration page.
This option can be used when a manual sync is needed. For example, if a Client Workspace or Matter folder was deleted by mistake in LexShare, the sync option can be used to recreate the folder structure.
The button may be disabled while configuration or folder synchronization is still in progress.

Launch LexShare
After LexShare is configured, users can launch LexShare from TimeSolv.
To launch LexShare:
- Navigate to Documents > Documents.
- Open the LexShare tab.
-
If configuration is still in progress, the page may display the following message:
Configuration in progress. Please refresh after a few moments.
Click Refresh after a few moments.
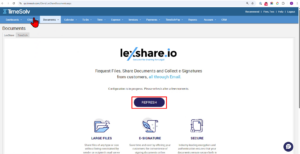
- Once configuration is complete, the Launch button will appear.
-
Click Launch.
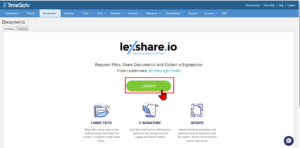
- LexShare will open in a new browser tab.
Depending on the user/session state, the user may be taken directly into LexShare or may be prompted to sign in.
If prompted, sign in using the LexShare account credentials.
Once logged in, the user will be taken to the LexShare workspace screen.
LexShare Workspace Structure
After LexShare is configured, Clients and Matters from TimeSolv are created in LexShare as workspaces and folders.
Client Workspace
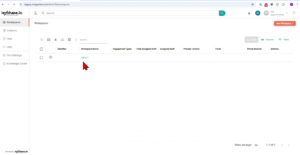
Clients from TimeSolv appear in LexShare under Workspaces.
To access a client workspace:
- Launch LexShare from Documents > Documents > LexShare.
- On the LexShare Workspaces screen, locate the Client.
-
Click the Client name.
Matter Folder
After opening the Client workspace, the related Matters appear as folders within that Client workspace.
To access a Matter folder:
- Click the Client workspace.
- Open the Files tab.
-
Click the Matter folder.
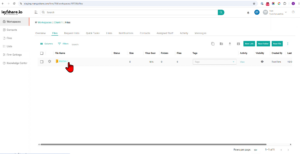
From the Matter folder, users can manage documents related to that Matter.
Migrate Documents
To migrate documents to LexShare, navigate to Documents>Settings>Configure LexShare.
Click on the ‘Migrate Documents to LexShare’ button.

A message at the top of the screen will inform the user that the process has started successfully.
The firm will also receive an email once the migration process starts.
Any files stored in TimeSolv will be migrated to LexShare. Files stored in TimeSolv will continue to be accessible alongside LexShare following the migration.
Note: The migrated files will appear in LexShare as if they have been uploaded by the user who clicked the ‘Get Started’ button.
When migration is complete, the firm will receive an email confirming successful completion.
Manage Matter Documents
When LexShare is configured, a ‘View Documents’ button is displayed under the Matter>Documents tab.

When clicked, the LexShare portal is opened in a new tab and the user is redirected to the respective Matter’s folder within LexShare.
From under the LexShare Matter folder screen, users can:
- Create new folders
- Upload new files
- Preview files
- Archive files
- Download files
- View file activities (an audit trail)
- Rename the file
- Share the document
- Request Files
- Request an eSignature (for PDF files only)
Archived Documents
To archive a document, under LexShare WorkSpaces>Client>Matter Files screen, users can archive either an entire Matter document folder or an individual document by clicking on the 3 dots icon next to the folder/document.

To manage archived folders/files, click on the 3 dots at the top menu and select ‘View Archive’:

Users can do two things with archives files/folders:
- Re-instate the folder/file
- Delete from the database
CAUTION: Deleting from the database will be an irrecoverable hard-delete.
Share a Document
Under LexShare Workspaces>Clients>Matter Files screen click on ‘Share Files’.

This will open a pop-up allowing the user to:
- Select/upload files to share.
- Add security to files.
- Add an expiration date to files.
Request a Document
Under LexShare Workspaces>Clients>Matter Files screen click on ‘Request Files’.

This will open a pop-up allowing the user to:
- Add security to files – We recommend using the secret question/answer feature where users can choose from a list of pre-loaded questions.
- Set an expiration date for the file link.
- Send the email directly from within the LexShare web application. Alternatively, you can copy and paste the shareable link to an email.
NOTE: If you send the email via the LexShare web application it will be sent from a no-reply address rather than the attorney’s email address.
A request link will be generated, and optionally, emailed to the Client. When accessed, the Client can upload one or more files.

Enable LexSign
LexSign allows firms to request e-signatures from their clients.
To sign up for LexSign, please contact TimeSolv support as this feature requires an additional charge.
Once the feature is enabled for the firm, navigate to Documents>Documents>LexShare tab and ‘Launch’ LexShare.
Click under Firm Settings>Members tab within LexShare.
Click on the gear icon to enable LexSign against the user.

Click the toggle bar to enable E-Signature Access and save.

How to Create Templates in AssureSign
Follow the instructions provided in your welcome email to log into AssureSign.
Once logged in, navigate to ‘View Templates (simple setup)’ on the left menu column.

At the bottom of the screen select ‘Create Template’.

Name the template – This is what will appear in the Outlook plugin when you are selecting the template to use.
Optional: Add description.
Click ‘Continue’.

Assign the document you would like to use as a template.
A dialog box will pop up, click ‘OK’.
On the right pane of the open template, click ‘Add Signer’.
You will need to assign ‘JotBlocks’ per signer. These are the specific placements on the document for the signer to fill.
Drag and drop any Signature/Date Jotblocks you need by selecting from the right pane.

To add additional signers, click this icon —> 
For additional signers drag and drop JotBlocks as needed.
Once you have all the JotBlocks in place, you MUST do the following for the template to work:
1. Change the ‘Workflow Type’ to ‘Custom’. Then click ‘Edit Workflow’.

2. Select Notifications at the top and then delete all the notifications by clicking the ‘X’ on the right side. Then click ‘Done’ in the bottom right.

3. Click the three dots beside ‘Signer 1’.

Toggle the ‘Text Message (SMS)’ off by clicking it.

Then at the top of that pane click the ‘Authentication’ tab. On this tab delete the password for signer, then click ‘Save Signer’ in the bottom right corner.

4. REPEAT steps in B for all additional signers.
Your document is ready to use and you can click ‘Close’ in the bottom right corner.
Request an eSignature
Under LexShare, click on ‘All Workspaces’ screen. Access the Client-Matter document and right-click to select ‘Request Signature’.

A popup will appear to create the signature request. The link field allows the user to control how access is given to the document.
- Direct Link – anyone who has the document link can access the document.
- Question/Answer – gives a list of Question/Answer options to choose from as added security over document access. Make sure the answer is something both the user and the client know the answer to.

Next, select the appropriate Template from the drop-down (see here on how to create Custom Templates):
- Custom Templates – When the user requests the signature, they decide the exact location on the document for where the signature goes. These are useful for contracts/forms where the placement of the signature block changes around.
- Pre-built Templates – These templates are built inside of LexSign. These are useful for contracts/forms where the placement of the signature block always remains the same.
A link will be emailed to the Client for a signature request where they can type the signature with their keyboard or draw it with touch, mouse, or a stylus.
Once submitted, the requester will be notified that the signed file is ready to download.